ATmega328P Pinout Diagram, Pin Configuration, Brief Description & Datasheet
ATmega328P is a high performance microcontroller chip. Today we are going discuss its pinout diagram or pin configuration, uses, description, datasheet and other details on how to use this microcontroller.
ATmega328P Features / Technical Specifications:
- High performance design
- Low power consumption
- Total number of Analog Input pins are 6
- Contains 32 kilobytes of flash memory
- Contains 2 kilobytes of SRAM
- Contains 1 kilobytes of EEPROM
- 16 megahertz clock speed
- Minimum & maximum temperature -40 degree centigrade to 105 degree centigrade
- Total number of Digital I/O pins are 14
- Advance RISC
- Lock program functionality for programming code security
- Contains total three timers two 8-bit and one 16 bit
- Total number of I/O pins are 23
- Total number of PWM channels are 6
- Minimum and maximum operating voltage from 1.8V DC to 5.5V DC
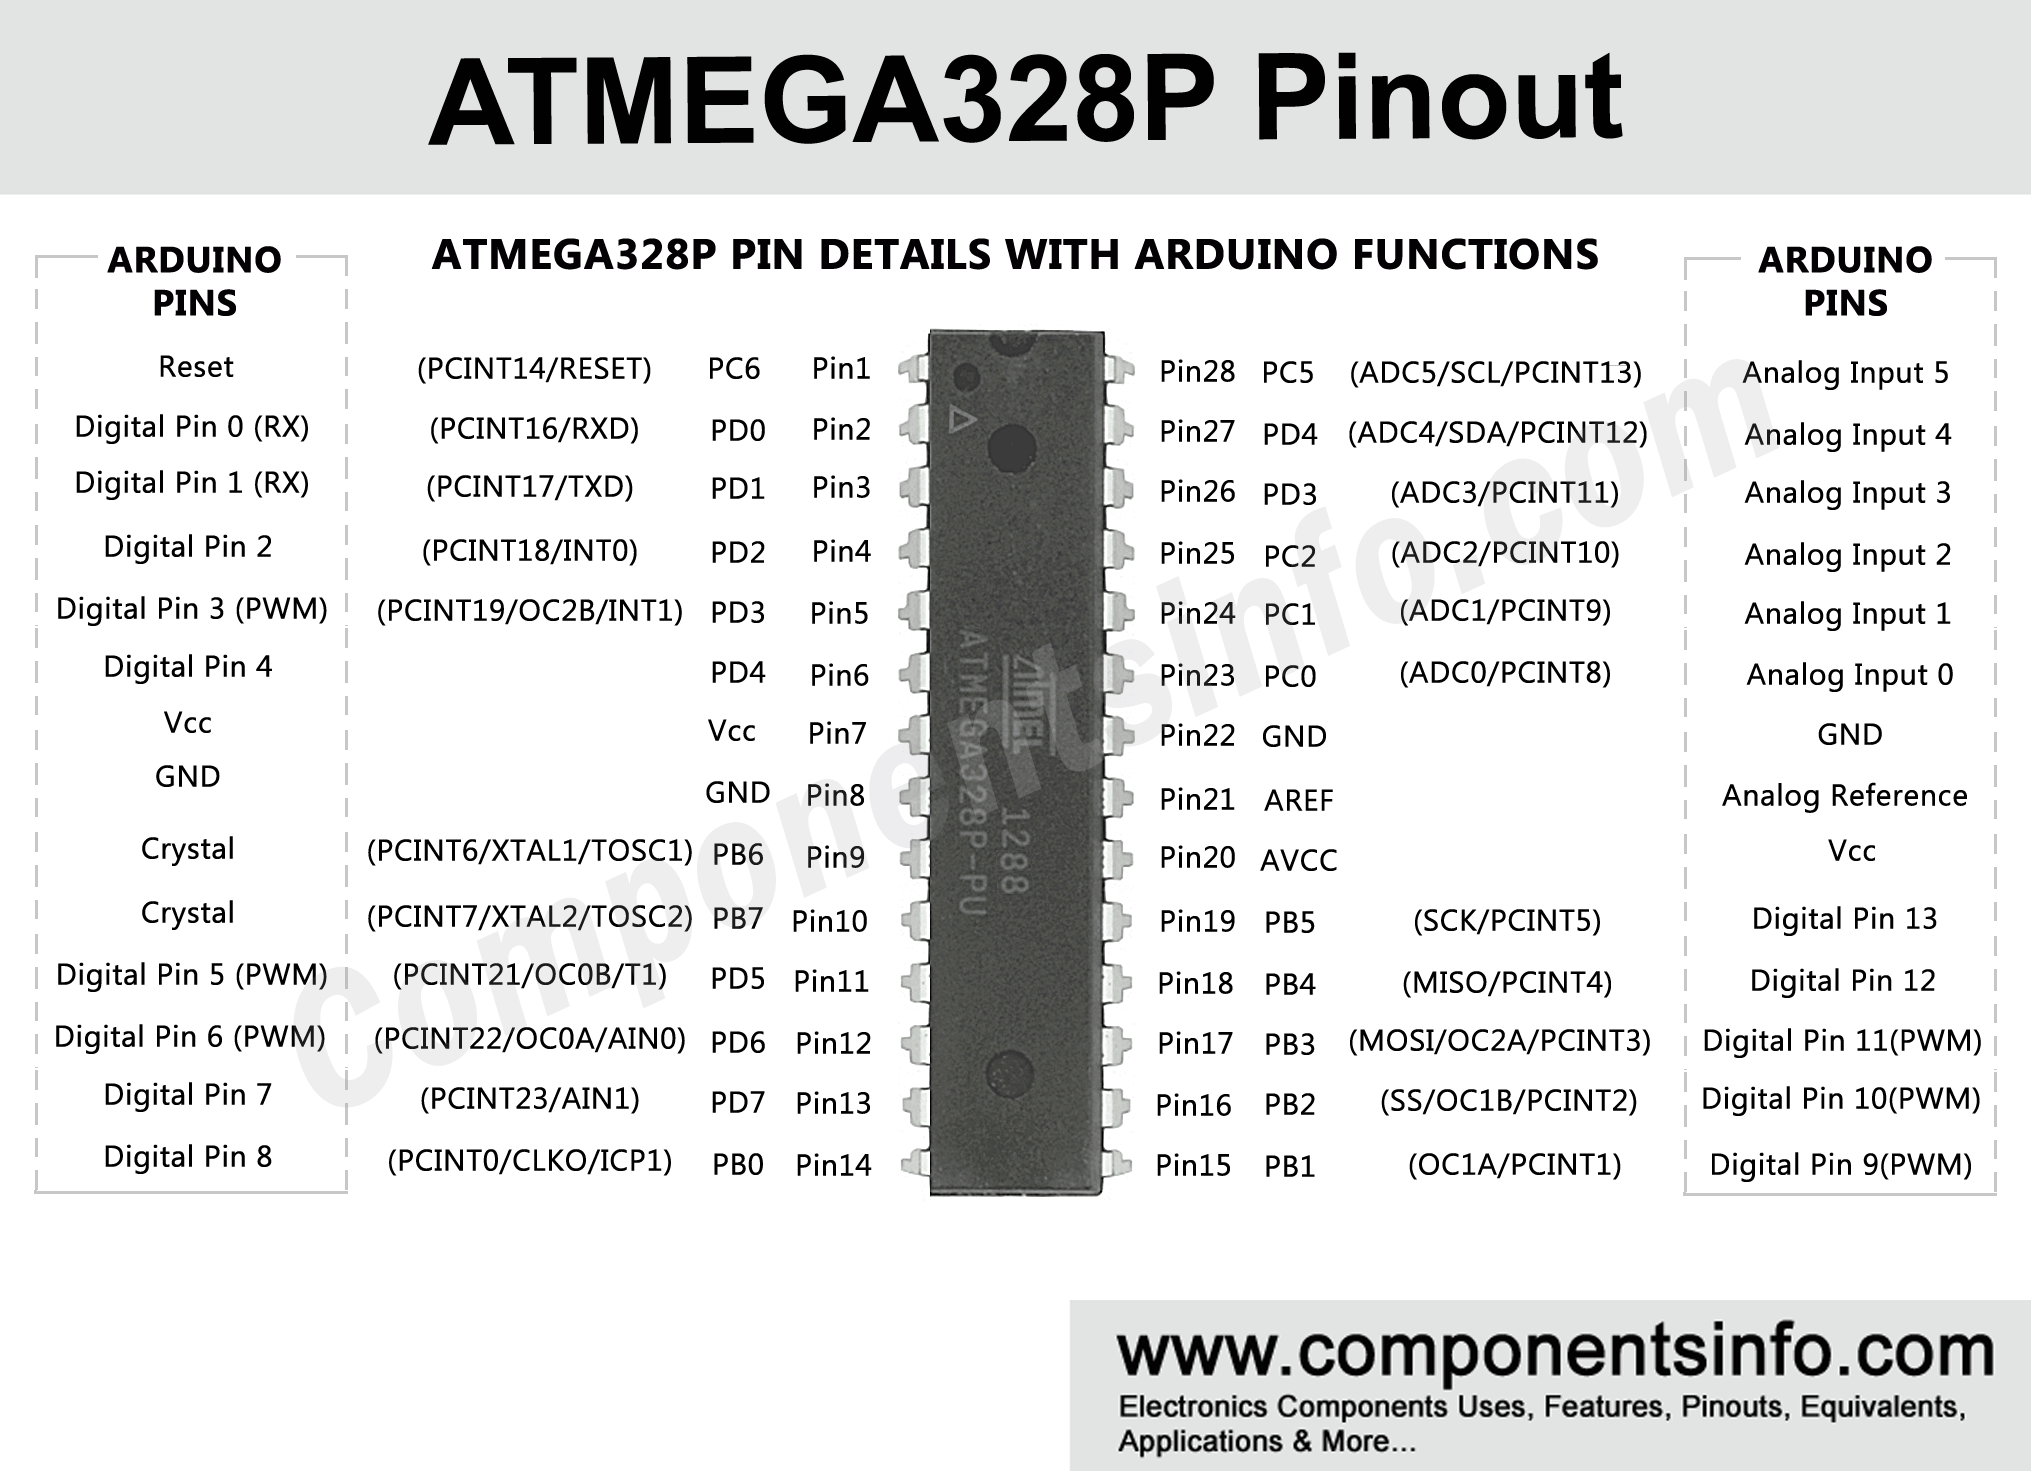
Pin Configuration:
| Pin# | Pin Description | Pin Function | Pin Function Description |
|---|---|---|---|
| 1 | PC6 | Reset | When this reset pin goes low the microcontroller & its program gets reset. |
| 2 | PD0 | Digital Pin (RX) | Input pin for serial communication |
| 3 | PD1 | Digital Pin (TX) | Output pin for serial communication |
| 4 | PD2 | Digital Pin | Pin 4 is used as an external interrupt 0 |
| 5 | PD3 | Digital Pin (PWM) | Pin 5 is used as an external interrupt 1 |
| 6 | PD4 | Digital Pin | Pin 6 is used for external counter source Timer0 |
| 7 | Vcc | Positive Voltage | Positive supply of the system. |
| 8 | GND | Ground | Ground of the system |
| 9 | XTAL | Crystal Oscillator | This pin should be connected to one pin of the crystal oscillator to provide external clock pulse to the chip |
| 10 | XTAL | Crystal Oscillator | This pin should also be connected to another pin of the crystal oscillator to provide external clock pulse to the chip |
| 11 | PD5 | Digital Pin (PWM) | Pin 11 is used for external counter source Timer1 |
| 12 | PD6 | Digital Pin (PWM) | Positive Analog Comparator i/ps |
| 13 | PD7 | Digital Pin | Negative Analog Comparator i/ps |
| 14 | PB0 | Digital Pin | Counter or Timer input source |
| 15 | PB1 | Digital Pin (PWM) | counter or timer compare match A. |
| 16 | PB2 | Digital Pin (PWM) | This pin is act as a slave choice i/p. |
| 17 | PB3 | Digital Pin (PWM) | This pin is used as a master data output and slave data input for SPI. |
| 18 | PB4 | Digital Pin | This pin is act as a master clock input and slave clock output. |
| 19 | PB5 | Digital Pin | This pin is act as a master clock output and slave clock input for SPI. |
| 20 | AVcc | Positive Voltage | Positive voltage for ADC (power) |
| 21 | AREF | Analog Reference | Analog Reference voltage for ADC (Analog to Digital Converter) |
| 22 | GND | Ground | Ground of the system |
| 23 | PC0 | Analog Input | Analog input digital value channel 0 |
| 24 | PC1 | Analog Input | Analog input digital value channel 1 |
| 25 | PC2 | Analog Input | Analog input digital value channel 2 |
| 26 | PC3 | Analog Input | Analog input digital value channel 3 |
| 27 | PC4 | Analog Input | Analog input digital value channel 4. This pin can also be used as serial interface connection for data. |
| 28 | PC5 | Analog Input | Analog input digital value channel 5. This pin also used as serial interface clock line. |
ATmega328P Description:
ATmega328P is a very advance and feature rich microcontroller. It is one of a famous microcontroller of Atmel because of its use in arduino UNO board. It is a microcontroller from the Atmel’s megaMVR microcontrollers family (Later in 2016 the Atmel is obtained by Microchip Technology Inc, the microcontrollers manufactured in megaMVR family are designed for handling larger program memories and each microcontroller in this family contains different amount of ROM, RAM, I/O pins and other features and also they are manufactured in different output pins which are from 8 pins to hundreds of pins.
The internal circuitry of ATmega328P is designed with low current consumption features. The chip contains 32 kilobytes of internal flash memory, 1 kilobytes of EEPROM and 2 kilobytes of SRAM. The EEPROM and the flash memory are the memories which saves information and that information still exits every the power is disconnected or off but the SRAM is a memory which only saves the information until the power is supplied and when the power is disconnected all the information saved in SRAM will be erased.
Applications:
There are thousands of applications for Atmega328P also more to come in near future depends on how creative one can think. Every day we see a new application built using the this chip by electronic students, engineers, hobbyists, tinkerers. Some of the applications for the chip are as follow.
- Industrial machinery controlling systems
- Solar powered machinery and applications
- IOT based applications
- Power supply and charger based applications
- Weather systems
- Wireless communication applications
- Security based applications
- Medical & health related projects & systems
- Automobile related applications
- And many more…
Replacement Or Equivalent
The Atmega328P can be replace with AtmegaA8
Alternative Part Numbers
The alternative microcontrollers for Atmega328P are Atmega8535, Atmega16 and Atmega32.
How to Use Atmega328P
Using an Atmega328P is same like any other microcontrollers, it is also required to be programmed before use. There are multiple programmers softwares are available to program the chip, one of the easy and more common way to program the chip is by using arduino board and the arduino software named Arduino IDE. The other programmer is the IDP program made for AVR controllers named “Atmel Studio” that can be downloaded free from Atmel and Microchip Technology websites. After installing the desired IDE or IDP software the user has to write the functions / program codes in the IDE or IDP programmer. There are several guides and tutorials are available online from where one can learn how to program the microcontroller to get the desired task from the chip.
How to Safely Run Atmega328P and Get Long Time Performance:
To get long term performance or if you want to run the Atmega328P for years in your electronic gadget or project it should be known that Chips or ICs are very sensitive and care must be taken when using them. The supply voltage should not exceed from 5.5V. Always check the voltage source output before connecting to the IC. When experimenting on the breadboard or soldering in a circuit it is highly recommended to check all the pins for short circuit before giving power to the IC, it is better to use an IC socket for the IC, but also check the IC socket pins for short circuit before placing the IC in it. IC socket also saves the IC from the heat generated from the soldering iron while soldering. Do not store or operate the chip below -40 centigrade and above 105 centigrade.
Datasheet
To Download the datasheet just copy and paste the below link in your browser.
http://ww1.microchip.com/downloads/en/DeviceDoc/Atmel-7810-Automotive-Microcontrollers-ATmega328P_Datasheet.pdf